Note: this article is deprecated as GitLab Pages now supports Let’s Encrypt since version 12.1.

GitLab Pages supports Let’s Encrypt since version 12.1. Find it when editing your domain under Settings > Pages. The methods described in this article are no longer necessary.
For those interested, we used to do it like the process down below.
Nowadays, it is important to offer a secure connection through your website via HTTPS and TLS/SSL. Getting an certificate used to be costly and difficult. Luckily, Let’s Encrypt offers a free and relatively simple way of setting up HTTPS for a certain domain.
Certificates from Let’s Encrypt are valid for 90 days. This means that we have to manually renew our certificate and update our site. At the time of writing, GitLab.com does not have a way of automatically renewing certificates for GitLab pages that use their own domain name.
In this post, we will configure Let’s Encrypt for our GitLab pages site, under a custom domain, but hosted on GitLab.com. We will automate the process using GitLab CI, Personal Access Tokens and gitlab-le.
Let’s Encrypt certificates
Transport Layer Security and Secure HTTP connections are of increasing importance on the web. Not only is the lack of a secure connection a risk to user privacy and data protection, it leads to a poor ranking in search results and can result in a weakened user experience in some browsers.
It isn’t as difficult to offer HTTPS as it once was. When using the default Gitlab Pages domain (*.gitlab.io, i.e. arothuis.gitlab.io/blog), it uses gitlab.io’s certificate without any further configuration. This is not the case when using your own hostname.
This is where Let’s Encrypt can help.
Let’s Encrypt is a global Certificate Authority (CA). We let people and organizations around the world obtain, renew, and manage SSL/TLS certificates. Our certificates can be used by websites to enable secure HTTPS connections.
ACME protocol
The Automatic Certificate Management Environment (ACME) makes it possible to set up an HTTPS server and obtain a certificate for that server on a certain domain name.
In general, ACME and Let’s Encrypt work in two steps:
- Domain Validation
- Certificate Issuance
1. Domain Validation
Let’s Encrypt, as the certificate issuer, needs to verify that the domain is under the control of the agent, the one that requested the certificate. This challenge can either be done by provisioning a DNS record or by adding an HTTP resource under a public well-known URI.
Besides the challenges, the Let’s Encrypt Certificate Authority (CA) also provides a nonce that must be signed with the private key pair of the agent to prove that it controls the key pair.
After the agent has added the DNS record or added the specific filename with contents at the agreed URI and after the provided nonce has been signed with the agent’s private key, the Let’s Encrypt CA will check if the challenges have been satisfied: the signature on the nonce is verified and the hosted file or DNS record is acquired and its content is checked. Is everything OK, then the agent’s key pair is considered an authorized key pair.
2. Certificate Issuance
Obtaining a certificate for a domain is done by sending a Certificate Signing Request (CSR), signed using the authorized key pair. The Let’s Encrypt CA verifies the signatures and issues and returns a certificate with the public key from the CSR.
The agent can now use the certificate along with the key pair to offer HTTP over TLS: HTTPS.
Certbot and GitLab Pages
Let’s Encrypt uses certbot by the Electronic Frontier Foundation for the configuration and renewal of certificates. Certbot, a python-based tool, has built-in support for some software on certain systems to allow for the automated renewal of certificates. For GitLab pages under a custom domain certbot can only be used in non-automatic, manual mode. To automate the process, skip to the next paragraph.
First, download and install certbot. Then, request a certificate for your domain and provide an email address to receive notifications:
sudo certbot certonly -a manual -d example.com --email [email protected]
After you have accepted the terms and conditions and agreed to logging your IP address, certbot will give you further instructions. In my example, it looked like this (yours will be different):
Create a file containing just this data:

 WJIibZpHV8Hbko2BzTwPGFEQcNp01ngXUhcx_c3mq10.l24WY5Yb50c0qKDNbIOnd2DEbgudMzTkEVD05wYHgu4


 And make it available on your web server at this URL:

 http://example.com/.well-known/acme-challenge/WJIibZpHV8Hbko2BzTwPGFEQcNp01ngXUhcx_c3mq10

 Press Enter to Continue
In our remote GitLab repository, we must write
the data at the URI certbot has given us.
In our example, we create and commit a file
at public/.well-known/acme-challenge/WJIibZpHV8Hbko2BzTwPGFEQcNp01ngXUhcx_c3mq10 containing WJIibZpHV8Hbko2BzTwPGFEQcNp01ngXUhcx_c3mq10.l24WY5Yb50c0qKDNbIOnd2DEbgudMzTkEVD05wYHgu4
and make sure it is published through the
pages deployment pipeline.
After the pages pipeline completes, press enter
in certbot to continue. It tells us the certificate
and chain have been saved at:
/etc/letsencrypt/live/example.com/fullchain.pem and
/etc/letsencrypt/live/example.com/privkey.pem.
To offer valid certificates from GitLab Pages, we need to copy and paste the content of these file to our pages configuration on GitLab:
- Go to your online GitLab project
- Go to
Settings > Pages - Copy the contents of
fullchain.peminto Certificate (PEM) - Copy the contents of
privkey.peminto Key (PEM) - Save changes and wait for the DNS changes to kick in
Automation via GitLab CI
Let’s Encrypt certificates need to be renewed every 90 days. Although Let’s Encrypt mails us to warn us about upcoming expirations, the described manual process is quite laborious to repeat every 90 days.
At first, I tried to automate the process slightly by running certbot locally and adding the challenge path and contents through configuration variables in my build. This still involved a lot of manual steps, as I would still need to run certbot-auto and input path, contents and PEMs on GitLab.
I decided that I would either look for an existing solution or code my own, as GitLab offers an API to interact with repositories and their configurations. I found a tutorial about a tool for jekyll. This was not useful for me, as I use Hugo and I want a more general solution. Then I came across a quite informative blog post from Harenslak about automating the process via custom bash scripts. Although it works nicely, I found it more work than necessary.
Automated renewal using gitlab-le
Then I found a tool in Node.js that offered a single commandline solution: gitlab-letsencrypt. Easy to install and easy to use.
You can use it as follows:
gitlab-le \
--email      [email protected]                        `# REQUIRED - Let's Encrypt email address` \
--domain     example.com www.example.com                `# REQUIRED - Domain(s) that the cert will be issued for (separated by spaces)` \
--repository https://gitlab.com/gitlab_user/gitlab_repo `# REQUIRED - Full URL to your GitLab repository` \
--token      ...                                        `# REQUIRED - GitLab personal access token, see https://gitlab.com/profile/personal_access_tokens` \
--production                                            `# OPTIONAL - Obtain a real certificate instead of a dummy one and configure your repository to use it`
--path                                                  `# OPTIONAL - Absolute path in your repository where challenge files should be uploaded`
--jekyll                                                `# OPTIONAL - Upload challenge files with a Jekyll-compatible YAML front matter` \
How the automation works is described in the project’s repository:
- Requests a challenge from Let’s Encrypt using the provided email address for the specified domains. One challenge file is generated per domain
- Each challenge file is uploaded to your GitLab repository using GitLab’s API, which commits to your repository
- The challenge URL is repeatedly polled until the challenge file is made available. GitLab Pages take a while to update after changes are committed.
- If Let’s Encrypt was able to verify the challenge file, a certificate for that domain is issued 1.Each challenge file is removed from your GitLab repository by committing to it through the GitLab API
- If
--productionwas set, your GitLab page is configured to use the issued certificate
I have configured it to run in my .gitlab-ci.yml:
lets-encrypt:
  stage: deploy
  image: node:8
  script:
    - npm install -g gitlab-letsencrypt
    - gitlab-le --production --email $LE_EMAIL --domain $LE_DOMAIN --repository $GL_REPOSITORY --token $GL_TOKEN
  only:
    - schedules
As you can see, I fill in the arguments described above by
build variables.
The build variables are not public,
but are configured for the project under
Settings > CI/CD Settings > Environment Variables.
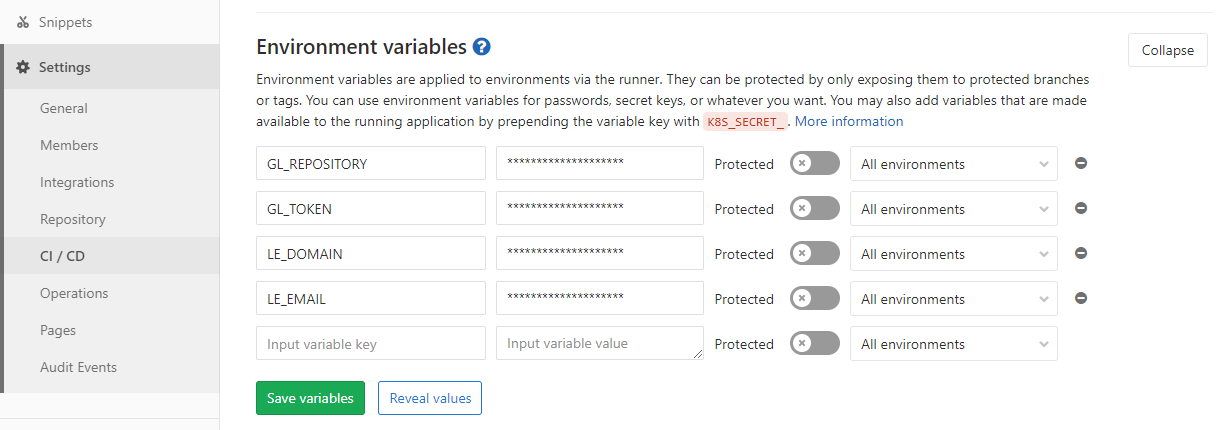
In order for this to work,
you need to have a GitLab Personal Access Token.
You can configure this under
User Settings (upper-right in the navigation bar) > Access Tokens.
Create an API grant, add it as a value for $GL_TOKEN,
and make sure not to share it publicly.
Scheduled renewal
OK, now the certificate is renewed during every build.
Given that Let’s Encrypt has a limit of 5x per week, this
is probably not the best idea.
GitLab CI can be scheduled to run, for instance every week.
As you may have noticed
in the .gitlab-ci.yml, we can set the “lets-encrypt” task
to run only for schedules. To prevent the other tasks
to have scheduled runs, you can add:
except:
- schedules
To configure a scheduled run, go to CI / CD > Schedules.
for your project. There, you can create a new schedule
for a given interval (i.e. every week).
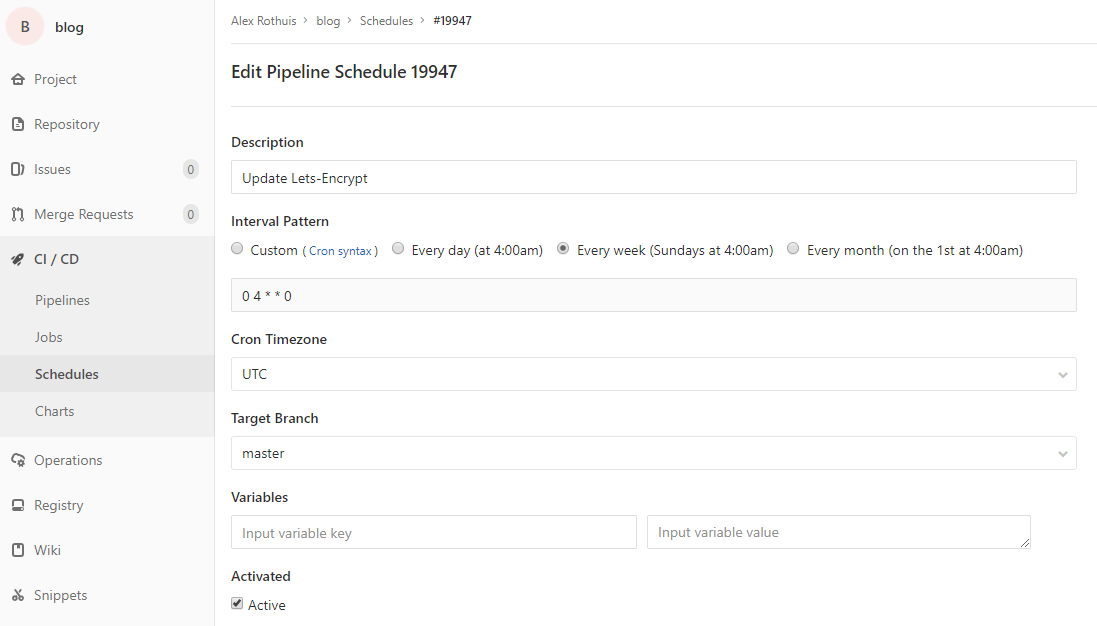
Keep in mind that gitlab-letsencrypt creates commits for
the creation and the removal of the challenge files, so this
will trigger another build independent of the “scheduled” build.
That’s it! We have configured a periodic, automatic renewal of our Let’s Encrypt certificate for our GitLab Pages under a custom domain using a Personal Access Token.
Thoughts?
Leave a comment below!