To successfully build complex software, it is important to reach a shared understanding regarding the product and its desired capabilities amongst developers, product owners and end users. This outlines the required external quality of a piece of software and makes its progress measurable.
Alignment of developers' and stakeholders' mental models can be achieved through conversation, by employing and evolving a ubiquitous language: a common language that correctly, consistently and unambiguously expresses the business domain.
This language is continuously leveraged throughout the development process: when creating and discussing user stories and requirements, when developing the software using domain objects and when confirming the requested feature works as expected through testing — acceptance or otherwise.
Behaviour-Driven Development
In Behaviour-Driven Development (BDD), features are derived from desired business outcomes collaboratively through conversation in a shared language. This dialogue between stakeholders and development is focused on outlining and verifying how the software ought to behave. User stories are the measure of functionality and their scope is defined by their acceptance criteria and conditions of satisfaction.
Specification by example is a way of doing BDD, identifying and exploring business rules by discovering, discussing and challenging examples for each conceived scenario.
Gherkin
A common way of capturing business requirements through BDD is done using the Gherkin language, a human-readable language containing a few formulas for writing clear specifications.
In Gherkin, each feature is subdivided in scenario’s which are described using a title and a combination of statements such as:
Given
<situation>When
<action>Then
<consequence>
Every statement is a high level description of what step is to be taken: implementation details have no place here. Instead of “I type Alex in the name field and click on the submit button”, it would be “I fill in my name as Alex and send the form.”
Examples can be given through multiple scenarios or by defining variables in scenario outlines and supplying data for these variables through a defined table.
A feature can be supplied with background information, usually in the style of a user story:
As a
<Role>,I want
<Desired Behaviour>,in order to
<Goal>
Cucumber
The benefit of this formulaic yet human-readable language is that it can be automated. Cucumber is a tool, implemented in several programming languages, that does just that. Gherkin steps are converted into executable code by implementing step definitions that are parsed and run by Cucumber.
BDD and executable specifications allow for outside-in test-driven development, starting from the higher-level requirements and ending in lower-level implementation details.
Because these feature specifications are readable by software, they serve as a testable documentation of the application’s behaviours, integrated in the entire development process. This increases software quality and developer confidence as the feature correctness (atleast, from a behavioural standpoint) is continuously verified by developers, stakeholders and, through the power of continuous integration, computers.
This integrated solution forms the basis for a living documentation, a documentation that is updated and evaluated regularly, and makes the process of documenting features less painful than writing and updating it by hand. For extra context, it is often a good idea to add more information to these features, even if these details are not executable. Explaining the behaviour of the system and the entities in the system can help understand the system and aid the onboarding process of developers.
End-to-end testing
End-to-end testing is a form of testing that covers all layers of an application: from one end to another. An end-to-end test drives the software as if it were a user and verifies expectations and requirements a user may have regarding the software’s behaviour.
This makes them suitable for asserting high level requirements without a lot of details, such as basic happy path use cases and critical failure scenario’s.
However, end-to-end tests touch the entire application, including external interactions with databases and web APIs. This makes them usually slower to run than other tests. To add insult to injury, end-to-end tests are more brittle than other tests due to their heavily integrated nature: any change regarding a feature in any layer could affect the outcome of the test.
Agile Test Pyramid
A common guide in Agile circles for formulating a testing strategy is found in the test pyramid. There should be a strong foundation in unit tests, component integration should be tested using integration tests and use cases should be covered in end-to-end tests.
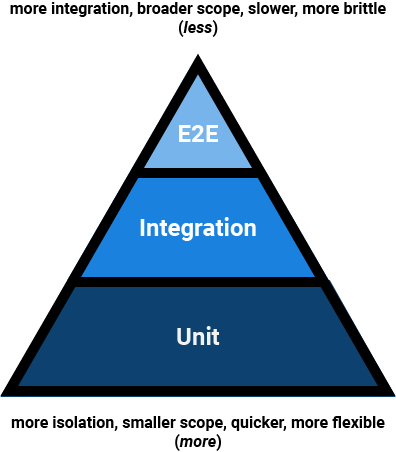
Unit tests are typically relatively easy to write, isolated, flexible and fast to run. They cover a single module, object or a group of objects (a component), and verify their public API works as expected. This includes happy paths, failure cases and edge cases.
Integration tests cover the integration of software components, between layers or services. This makes them more difficult to write, slightly slower and more brittle than unit tests.
At the top of the pyramid are end-to-end tests, acceptance and contract tests. These verify the exposed behaviour of an entire application or service. Because these are slow to run and difficult to maintain, it is often more prudent to spend more time in unit and integration tests. Nevertheless, they have their place in verifying high-level acceptance criteria and asserting the entire application works as intended.
Example: Wikipedia
To get started and put this theory into practice, we are going
to perform end-to-end tests for a web application you probably know.
Wikipedia. First, create a directory for the project and make
sure the directory structure test/e2e/features exists.
This is where the features for our end-to-end tests will reside.
If you want to check out the code and CI pipeline right away, go ahead and check it out on GitLab.
The user story
Let’s write a simplified end-to-end test for a commonly used Wikipedia feature: finding entries.
As a User
I want to find information by a relevant keyword
in order to easily find entries without having to browse each page by hand
The feature
We discuss the feature with the product owner and developers and come up with the following scenario’s during a brainstorm session.
Feature: Searching on Wikipedia
    As a User,
    I want to find information by a relevant keyword,
    In order to easily find entries without having to browse each page by hand

Scenario: A perfectly matching entry is found
  Given I am on the English Wikipedia main page
   When I search for "Socrates"
   Then I should see the entry with the title "Socrates"

Scenario: No possible matching entry is found
  Given I am on the English Wikipedia main page
   When I search for "Socratasty"
   Then I should see the search results page
    And I should not see a list of search results

Scenario Outline: Multiple possible matching entries are found
  Given I am on the English Wikipedia main page
   When I search for "<search term>"
   Then I should see the search results page
    And the search results should contain "<entry>"

  Examples:
    | search term       | entry                    |
    | Socratez          | Socrates                 |
    | Pllato            | Plato                    |
    | Greece Philosophy | Ancient Greek philosophy |
We save this feature to test/e2e/features/search.feature.
Project setup
Before implementing our feature as an executable test, let’s setup our project.
I’m using Node version 8, which can be installed through nvm or by using a docker container.
Now, let’s initiate our project, install and save our dependencies using npm:
npm init
npm install --save-dev cucumber nightmare chai
Cucumber.js is used to make our (Gherkin-based) specification executable.
The steps in our Gherkin need to be translated into actions, using step definitions. Definitions can be written any way we want and employing any library we want. Because we are going to do end-to-end testing on a web application, we should use a tool for emulating a browser.
However, as Gherkin is merely an abstraction layer for describing our tests, Cucumber could also be used for other types of tests (either higher or lower level) for performing tests on other platforms. It seems to work best for highly abstract test cases like the ones found in end-to-end functional tests.
We are going to use Nightmare. Nightmare is an electron-based (headless) browser automation tool, which can be used for UI testing. It’s a bit like the popular testing tool Selenium but quicker, easier to use and you don’t need Java. Keep in mind that electron uses the chromium engine, so certain tests may not cover all browsers.
In order to easily assert certain expectations and requirement, we can use an assertion library, such as chai.
The end-to-end feature we just wrote reside in a test/e2e/features directory
relative to our project root.
NPM scripts
In order to run testing scripts, we can add them to package.json, under scripts:
{
    "scripts": {
        "e2e": "node_modules/.bin/cucumberjs test/e2e/features --fail-fast"
    }
}
The --fail-fast flag will cause a failure to stop running tests.
This allows for a quick feedback loop and a lower build machine utilisation.
Let’s try and run the end-to-end tests:
npm run e2e
You should see the following:
UUUUUUUUUUUUUUUUUUU
This means Cucumber has read our feature file, but only sees undefined steps. Furthermore, Cucumber gives us more information about how to implement the missing steps in its warnings.
The step definitions
In our test/e2e/features directory, create a
directory called step-definitions. This
is where – you guessed it – our step definitions
will reside. Let’s create a file for our wikipedia-related definitions:
wikipedia.js.
Require the necessary dependencies in our definitions file:
const Nightmare = require("nightmare");
const { expect } = require("chai");
const { Before, Given, When, Then, After } = require("cucumber");
Because our tests are going to be simple, we are not going
to define a context or “World” for our steps.
A World is an isolated context for each scenario,
exposed to the hooks and steps as this.
Because Nightmare can hold that context for us,
we are going to reference Nightmare directly
using a mutable variable called browser and
make sure a fresh instance is started before each scenario
using Cucumber’s Before hook.
You can configure Nightmare
so that you can see what is happening,
by adding the show: true configuration.
But you probably want to turn this off when running
it during CI.
let browser;
Before(function () {
    browser = Nightmare({
        show: true
    });
});
It’s time to define our first step: going to the English Wikipedia main page. We represent the URL as a constant. Alternatively, you could create a step that references a country by a country code and use a variable for that.
const ENGLISH_WIKIPEDIA = "https://en.wikipedia.org";

Given("I am on the English Wikipedia main page", function () {
    return browser.goto(ENGLISH_WIKIPEDIA);
});
We could make this extremely terse by using arrow syntax.
However, if we were to introduce a custom World,
it would be added through the this scope.
Arrow functions do not bind this, so to reduce future pains
we are going to type a bit more characters.
Run npm run e2e again. It goes to the English Wikipedia main page!
However, our Cucumber test is still running while the browser is open
(until it times out). In order to make sure the browser is closed after
each scenario, we can end the browser session in an After hook:
After(function () {
    return browser.end();
});
Stopping and starting the browser every time may take too long.
If this is the case, you might want to share browser
session but provide the necessary manual clean-up measures in the
Before and/or After hooks. In our case,
replacing Before and After with
BeforeAll and AfterAll cuts the execution time in half.
Don’t forget to change the required functions as well!
Let’s add to the end of our file and define other steps in a
logical chronological order.
We are using a variable string
in When I search for "Socrates", Cucumber can easily
deal with this.
We fill-in the search input box
and click search button by referencing them using their CSS selector.
When("I search for {string}", function (searchTerm) {
    return browser
        .type("#searchInput", searchTerm)
        .click("#searchButton");
});
Now it’s time to evaluate our result and check if the
entry title is as we expect. Nightmare offers the
evaluate method to execute client-side JavaScript
on the page and return the result as a promise.
So we get the element with the ID “firstHeading”,
get its text content and trim it.
Then, back in our (Node) test context, we
use Chai’s expect API to verify that the title is correct.
Then("I should see the entry with the title {string}", function (expectedTitle) {
    return browser
        .evaluate(() => document.getElementById("firstHeading").textContent.trim())
        .then((titleText) => expect(titleText).to.equal(expectedTitle));
});
And our first scenario is defined! And, as you may have noticed, we have defined a lot of steps for the other scenario’s as well: reusability. 🙌
Determining whether we are on the search results page is implemented in the same way as verifying an entry page. As these pages are probable to evolve differently over time and the criteria for verification might change independently, this duplication gives us flexibility in the future.
Let’s also extract the search results title and create a constant for it we maintain at the same place as our previous constant:
const ENGLISH_WIKIPEDIA = "https://en.wikipedia.org";
const SEARCH_RESULTS_TITLE = "Search results";
Our step definition then becomes:
Then("I should see the search results page", function () {
    return browser
        .evaluate(() => document.getElementById("firstHeading").textContent.trim())
        .then((titleText) => expect(titleText).to.equal(SEARCH_RESULTS_TITLE));
});
In order to determine whether there are search results,
we can verify the presence/absence of the class mw-search-results
by determining its length.
Then("I should not see a list of search results", function () {
    return browser
        .evaluate(() => document.getElementsByClassName("mw-search-results").length > 0)
        .then((hasSearchResults) => {
            expect(hasSearchResults).to.be.false;
        });
});
Lastly, we need to verify the list of search results contains a desired term. For this we select the matches by class name, convert the HTMLCollection to an array, get the text content for each element and determine whether the expected title is present of the shown titles.
Note that we inject the variable from Node context to the front-end context in the evaluate function.
Then('the search results should contain {string}', function (expectedMatch) {
    return browser
        .evaluate(() => Array
                .from(document.getElementsByClassName("mw-search-result-heading"))
                .map(element => element.textContent.trim())
        )
        .then((resultHeadings) => expect(resultHeadings).to.contain(expectedMatch));
});
Running our script using npm run e2e, should give us
all green:
> cucumber-js test/e2e/features --fail-fast

...................

5 scenarios (5 passed)
19 steps (19 passed)
0m12.529s
Optimizing
In our When I search for {string} definition,
we use the .type method to type in the search input.
This fires type events (i.e. onKeyDown) and is slower
than using the .insert method. Strangely,
we need to add a slight .wait
before continuing to the next step because this is so fast.
250 ms works for me,
but you might use a different value or,
instead of waiting for a fixed amount of time,
wait for a certain element to appear.
When("I search for {string}", function (searchTerm) {
    return browser
        .insert("#searchInput", searchTerm)
        .click("#searchButton")
        .wait(250);
});
This can shave a few seconds off your test run. 🕒
Prettier output
OK, so far so good. But what are these dots all about? It would be nice if we could see our scenario’s in text while they’re running — especially if we are going to run our tests in a headless environment such as a CI pipeline.
Sadly, although Cucumber offers some formatting options, this specific one is not included by default.
No worries, we can install a custom formatter for this purpose:
npm install --save-dev cucumber-pretty
Change the e2e script or add another in package.json:
  ...
  "scripts": {
    "e2e": "node_modules/.bin/cucumber-js --format=node_modules/cucumber-pretty test/e2e/features --fail-fast"
  },
  ...
Continuous integration
Now that we have our features running locally, it should be easy to incorporate this in a continuous integration pipeline. In practice, you would want to run these tests in a test or staging environment.
Basic setup in GitLab CI
If we are using a (private) GitLab repository,
we can enable GitLab’s CI feature by
adding a .gitlab-ci.yml file to our project and
setting up some configuration in there.
Basically, we just want a node container,
install our dependencies and run our test.
As an aside, keep in mind that you could also create a prepared image so even more time can be shaved off the tests as installation steps can be skipped.
Our configuration looks like this:
before_script:
    - npm install

cache:
    untracked: true
stages:
    - test

e2e:
    image: node:8
    stage: test
    script:
        - npm run e2e
Sadly, this does not work. It gives us the following error:
✖ Given I am on the English Wikipedia main page # test/e2e/features/step-definitions/wikipedia.js:15
       Error: function timed out after 5000 milliseconds
           at Timeout._onTimeout (/builds/arothuis-blog-experiments/wikipedia-bdd/node_modules/cucumber/lib/user_code_runner.js:93:22)
           at ontimeout (timers.js:475:11)
           at tryOnTimeout (timers.js:310:5)
           at Timer.listOnTimeout (timers.js:270:5)
It looks like Cucumber times out on the execution of the step. This means something went wrong inside the step definition: either in the traffic between the test runner and the web or in the way Nightmare works.
Fixing nightmare CI issues
After debugging for a while,
I figured out the problem was in Nightmare by
running Nightmare in debug mode by adding the
environment variable DEBUG=nightmare:
nightmare electron child process exited with code 127: command not found - you may not have electron installed correctly
Turns out, it is pretty difficult to run a headless browser inside of a GUI-less CI runner. 😉
To mitigate this,
we can use X-virtual framebuffer (xvfb), an X11 display server
that can execute operations in memory without showing screen
output. To use this, we need to install xvfb and its dependencies
in our node container and run the npm run e2e command
through xvfb.
before_script:
    - apt-get update -y
    - apt-get upgrade -y
    - apt-get install -y libgtk2.0-0 libgconf-2-4 libasound2 libxtst6 libxss1 libnss3 xvfb
    - npm install

cache:
    untracked: true
stages:
    - test

e2e:
    image: node:8
    stage: test
    script:
        - xvfb-run -a --server-args="-screen 0 1024x768x24" npm run e2e
This fixes the problem. Splendid. 🧐 As a trade-off, it makes our build a tad slower because of the required extra setup. It might be beneficial to introduce a prebuilt image to shave off some more time.
Alternatively, you could split up your test in steps and make them run in parallel in the CI pipeline.
In conclusion
The code (and CI pipeline) for this tutorial can be found on GitLab. End-to-end testing does not need to be scary, difficult or slow and the produced code is nice and readable. The features, written in an understandable, common language, can even be embedded in the development process in the form of specification by example. In turn, using continuous integration, this can serve as a basis for a living documentation.
However, end-to-end tests are not a be-all and end-all testing solution. In order to keep feedback frequent and quick and make the test suite less brittle, a testing strategy should be applied that leverages unit tests, integration tests, end-to-end tests and other tests fit for verifying the conditions of satisfaction are met. The Agile test pyramid can be a rule-of-thumb for drafting such a strategy.
Thoughts?
Leave a comment below!